Home
Glow Yoga Kids
  • Home
  • Why Kids Yoga
  • About
    • About Us
    • Meet our Team
    • GYK in the Media
  • Programs
    • Yoga For My School >
      • Booking Yoga For My School
    • Yoga For My Daycare >
      • Booking Yoga For My Daycare
    • Weekly Studio Classes >
      • New Client Intake Form
    • Birthday Parties >
      • Booking My Yoga Birthday
    • Yoga Camps >
      • Camp Registration
    • Yoga For My Team or Club >
      • Booking Yoga For My Team
    • FREE Yoga!
    • Private Classes
    • Homeschool Yoga
    • Yoga in the Park
    • Yoga for Special Events & Festivals
    • Referral & Loyalty >
      • Referral Form
  • Clients
    • Clients
    • Testimonials
  • Contact
  • Shine On
  • Yoga Teacher Training
  • Family Resource Page
  • Home

Kids Yoga Pose of the Week! Locust

6/26/2015

0 Comments

 
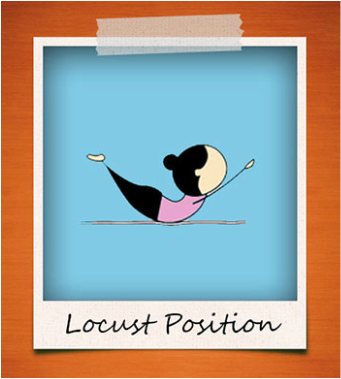
This is one of those poses that kids will either LOVE to do, or want nothing to do with. The more fun you add to it though, the more likely their experience with it will be the aforementioned. Have some fun today with your littles and get your Locust on! 

Locust Pose

Aka: Grasshopper, Superman, Whale, Alligator, Swimming, Paddling on a Surf Board, Airplane Superman/Banana.

Historically, this pose is done with the arms by the side of the body with the palms facing up to the sky. Today we will explore both the classic and extended arm variations in our step-by-step instructions.
How to #1: Classic Version
  1. Laying on your belly, place your arms by your sides palms facing up, finger tips pointing towards your toes and let your forehead rest on the ground. 
  2. Keeping your body strong, begin to lift your head, chest, upper ribs, arms and legs away from the ground. You'll be resting on your lower ribs, belly and top of the pelvis. 
  3. Think about squeezing your legs in towards each other & imagine reaching your fingers back towards your toes. 
  4. Remember to breathe! Take 3 deep breaths, then lower everything back down to the ground & have a rest on one ear. Repeat 2-3 times.

Picture
Another BIG thank you to www.afterschool.ae for making this blog series possible. Your support and encouragement with this is appreciated!
How to #2: Extended arms
  1. Laying on your belly, reach your arms straight in front of you palms facing down and let your forehead rest on the ground.
  2. Keeping your body strong, begin to lift your head, arms, chest, upper ribs, and legs away from the ground. You'll be resting on your lower ribs, belly and top of the pelvis. 
  3. Think about squeezing your legs in towards each other & imagine your toes reaching towards the back of the room while your finger tips reach towards the front - this creates a lengthening throughout the whole body!
  4. Remember to breathe! Take 3 deep breaths, then lower everything back down to the ground & have a rest on one ear. Repeat 2-3 times.
  5. Turn this one into a half locust by lifting opposite hand and foot. Move with breath, exhaling to lift inhaling to lower then exhale to lift on the opposite side. 

Fun variations:
Note: These variations are all done while in the extended arm version of the pose!
  1. Swimming: In your summer/ocean/beach themed class, go for a swim in locust pose. Move your arms in a front crawl motion, butterfly, doggy paddle, or any other funny swimming style you can come up with. 
  2. Paddling on a Surf Board: Same idea as the swimming pose, but imagine you are paddling your surf board out to sea! Check for a good wave by coming into cobra pose, then get up onto your board in Warrior 2 and hit the wave.
  3. Whale/Alligator: Open and close your jaw by moving your arms together then apart! You can also splash your tail around by moving your legs from side to side or up and down. To have even more fun in these poses, try rocking forwards and back & imagine that you are diving into the water. Finally, if you are doing all of this as a whale, maybe you even spray some water from your blow hole!
  4. Airplane: Go on an adventure, traveling over the Savanna, Rainforest, North Pole, or anywhere else you can imagine in your very own plane. Same set up, however instead of reaching your arms straight forwards, reach them out to your sides. Keeping your body long and strong, rock from side to side to steer the plane - and maybe even add in some cool sounds too.
  5. Superman/Banana: Inspired from my P90X ab work out, this one gets lots of giggles. Start in the extended arm variation of Locust and instead call it Superman. Ask the children to roll onto their back in a similar position: arms raised up behind head with their head, shoulders & legs lifted, we'll call this one Banana. When the teacher calls out Superman, everyone rolls back to the original position. Have fun with this by calling the change slowly, or quickly. Try rolling without using your hands for an added challenge. 

Benefits:
  • Strengthens the muscles around the spine, bum, and back of the arms & legs. 
  • Stretches the shoulders, chest, belly and spine.
  • Improves posture.
  • Stimulates the abdominal organs, thereby relieving symptoms of indigestion.
  • Relieves stress.

Connections:
  • Create a group flower pose by laying down in a circle with your hands touching. Have everyone come into Locust pose at the same time! Have fun with this by each taking turns coming into the pose & going back down to watch your flower move. OR to get your kids holding the pose longer have them each come into it one after the other and hold the posture until it gets all the way around the circle, then go back down to rest on your forehead one after the other. 

Don't forget to check out our other Pose of the Week shares! The list is building. Boat Pose, Downward Facing Dog, Seated Forward Fold, & Chair Pose. 

Enjoy your weekend friends, and Shine On! 

Love, 

Vanessa
0 Comments

Dads Through Their Daughters Eyes: A Father's Day Special

6/21/2015

0 Comments


Happy Father's Day!

If you're like me, Father's Day is tricky. My dad is awesome, but I just never know what to get him and I find it hard to make it special because he's such a guys guy. So when I was asked to be a guest blogger on a special Father's Day feature by afterschool.ae, I was totally IN! 
Picture
It turned out to be a great addition to the axle stands I bought him too, he even said "Thank you for the blogger card" as we were leaving from our visit today. Too funny!

Click the pic, and have a look at mommy blogger #1 (that's me!)

Thank you to afterschool.ae for featuring me in your fantastic post! Not only was this fun to do, it was also great reading the responses from the other guest bloggers as well.
In light & love,

Vanessa
0 Comments

Kids Yoga Pose of the Week! Boat Pose.

6/20/2015

0 Comments

 
Wow! It's been 4 weeks already since we began this Pose of the Week series, do you believe it? Time just flies when you're having this much fun! So far, we've covered some great classic poses like Chair, Seated Forward Fold & Downward Facing Dog and we've added our favorite variations and partner connections for you. Today's we mark the one month point with one tough pose - Boat Pose! 

Boat Pose

Aka: Row boat, turning the boat, mighty morphin' power boat, octopus, sail boat, cruise ship, battle ship/pirate ship. 
Picture
Once again, a special thank you to www.afterschool.ae for allowing us to use these super-fantastic images & making this Pose of the Week series possible. You are amazing!
How to:
  1. Sit on your bottom with your knees bent, feet flat on the floor.
  2. Place your hands in between the bends of your knees, so you are holding on to the back of your quads.
  3. Roll your shoulders back and shine your heart forward. It's important to keep your tummy tight and chest lifted, so think about lifting your heart to the sky throughout the whole pose! 
  4. Slowly start to walk your feet back a bit so that just your toes are touching the floor.
  5. Lift up one foot, then the other and hold your knees at 90 degrees so you are balancing on your bottom. 
  6. Now you can challenge yourself by letting go of the legs and extending your arms straight forward! 
   7.   If you want to go a little farther too, straighten your legs up one at a time - creating             a V shape with your body. Remember to keep your tummy tight, chest lifting and                 back straight!
In my experience so far, I have found that children tend to give up easily in this pose since it is highly engaging for your core. I suggest teaching the steps as 3 levels to give them the option of practicing in a way that feels good for their bodies. Step 1 = sit in the balancing position & keep your hands on the back of your legs. Step 2 = releasing your hands keeping your legs at 90 degrees. Step 3 = extending your legs straight up! Encourage them to try all the steps, but then give them the option of holding the posture in the step that is right for them! To keep them in the pose longer, try some of our other fun suggestions below. 

Fun Variations:
  1. Row Boat: Instead of keeping your arms straight out in front of you, you can pretend to row your boat & even sing the classic song!
  2. Turn the boat: To steer your boat, reach your arms out to your sides into a T position (keeping your legs the same). Twist your left hand towards your right knee as your right arm reaches towards the back, this is turning right! Go ahead and do the opposite to turn left. Have someone be the boat captain and call out "Left, Center, Right" or do this as a breathing exercise inhaling to center, exhaling to twist.
  3. Might Morphin' Power Boat: To stay in this pose even longer, you can let your boat morph into a bunch of different shapes while continuing to balance on your bottom. Use your arms and legs creatively to come up with some interesting shapes, or maybe even some new poses. Turn this into a mirroring game by doing it with a partner! They have to copy your movements as if looking into a mirror. OR create a group game by allowing each person to have a turn leading the group in a morph. 

Benefits:
  • Strengthens the abdominals, hip flexors and spine.
  • Stimulates the kidneys, thyroid and intestines.
  • Relieves stress.
  • Improves digestion.
  • Helps build stamina.

Connections:
Yoga is so much better together! Here are some ideas of how to incorporate boat pose into your partner and group work.
  1. Octopus: Try doing boat back to back with a partner! You can link arms for better balance, or simple wriggle your arms and legs freely like an octopus.
  2. Sail Boat: Sit facing your partner, knees bent feet flat on the floor as if preparing for boat. Turn your toes up to connect them together with your partner, then link hands (make sure you knees are on the inside of your arms). One foot at a time, slowly lift each sail up by pressing your feet into one another and straightening your legs. 
  3. Cruise Ship: Start in the same position as sail boat, however this time when linking hands make sure that your knees are outside of your arms. Again, turn your toes up to connect them with your partner and one foot at a time slowly lift each leg up and out to the side. Continue pressing your feet into one another to keep your legs up off the floor.
  4. Battle Ship/Pirate Ship: Sit in a circle with your group, knees slightly bent feet flat on the floor. Place your hands on the shoulders of the person to either side of you. All together, begin to lift your legs off the floor and straighten them out so that your feet meet in the middle. To challenge your group a little more, let go of your friend's shoulders and use your arms to row the ship!

I hope you enjoy all of these fun boat variations and ways to connect with one another in class. Please share any other ways you go boating with your students in the comments! I'd love to hear them.

Keep shining brightly, living boldly, and being your beautiful authentic self. 

Love,

Vanessa
0 Comments

Kids Yoga Pose of the Week! Pose #3, Downward Facing Dog

6/14/2015

1 Comment

 
If you were to do a random poll of people on Jasper Ave, asking them to name 3 yoga poses - I'd be willing to bet that 98% of people would come up with downward facing dog somewhere in that list. It is a pose that has become a symbol for yoga. In our kids and family classes, it is one that brings us together to create laughter, joy and plenty of fun!

Downward Facing Dog

Aka: Mountain, mountain range, tunnel, walking the dog, 3-legged dog, dog training, double dog, relaxing on a dog, dog pyramid, dog-frog jacks.
How to:

  1. Start on your hands and knees, hands right under your shoulders and knees under your hips.
  2. Spread your fingers out nice and wide & tuck your toes under.
  3. Exhale and press into your hands and lift your knees away from floor while lifting your hips up to the sky.
  4. Begin to push the top of your thighs back to straighten your legs & draw your heels towards the floor. Don’t worry if your heels stay lifted! The idea is to energetically be drawing them down towards the earth. 
Picture
Huge credits to www.afterschool.ae for making this blog series possible! We love these images and are so grateful for your contribution <3
    5.   If your legs are feeling tight, you can walk your dog by bending one knee & rooting              down with the opposite heel – then switch as many times as you need.
Fun variations:
  1. Mountain, Mountain range & tunnel: Depending on the theme you are working with, you can call this pose mountain! When a bunch of mountains line up hip to hip, they form a mountain range or a tunnel which is absolutely perfect for crawling through (and getting the children to stay in the pose for longer). Ask the child at the back of the mountain range or tunnel to crawl on their belly all the way to the front! Once he/she makes it through, they place their mountain hip to hip with the mountain at the front of the line. Continue on in this way until everyone has had a turn! 
  2. Walking the dog: As I mentioned before, you can walk the dog while in downward facing dog all by yourself…but yoga is better together! When you add a partner to this pose, you also add extra laughs and fun. Have your class partner up. One partner will be the dog; one will be the dog walker. Dog walkers will grab onto the shirt of their dog and bring them for a little walk around the room. Take turns!
  3. Dog training: Add on to the dog walking fun by asking your dog to do some tricks… sit, roll over, play dead, etc. You can really ham it up as the dog by panting, barking, and any other silly doggy things you can think of.
  4. 3-legged dog: From your downward facing dog, inhale and lift one leg up towards the sky! You can hold this position for a few breaths and then switch legs OR on your exhale step your foot up between your hands. From this position you can move into so many different poses! Try a low lunge, high lunge, warrior 1 or 2, triangle, pyramid, crescent, etc. Make sure that whatever you do to one side, you do to the other!
  5. Dog-Frog Jacks: Similar to jumping jacks, dog-frog jacks will get your heart rate up quick! From your downward facing dog pose, exhale and jump your feet forwards towards the outsides of your hands into a frog squat. Now inhale and jump back into dog! Dog-Frogs!

Benefits
  • Energizes the body.
  • Stretches the shoulders, arms, hamstrings, calves, arches of the feet, hands and back. 
  • Strengthens the arms and legs.
  • Calms the mind and helps relieve stress.
  • Improves digestion.

Connections
I already mentioned a few ideas for partner poses in downward facing dog, but these next ones add another dynamic to your class as they involve some acrobatics!

  • Double dog: One partner comes into dog, while the other partner stands alongside them (facing the same direction) lined up at approximately the dog’s shoulders. The standing partner will fold forwards, bringing their hands about a foot in front of the dog’s. Lifting one foot at a time, the second partner will place their feet onto the dog’s hips. This is double dog! Partner 2 can do their best to bring their body to 90 degrees by walking their hands back towards the dog; as this happens partner 2’s weight will press the dog’s hips and legs towards the floor to give their legs an added stretch. 
  • Relaxing on a dog: Partner 1 comes into downward facing dog, while partner 2 comes to stand in front with their feet between partner 1’s hands (toes pointing the same direction as the fingers). Partner 2 will begin to slowly lean back onto the dog, at first possibly sitting on their shoulders, then resting onto their back and hips. Straightening their legs, partner 2 will also stretch their arms back while letting their weight relax onto the dog. Ahhhhhh! So nice, for both partners!
  • Dog pyramid: This one is a little trickier, and should only be attempted by able bodies with the guidance of an adult – especially for those who have little yoga experience, make sure you have a spotter. 
Picture
Have two partners come into a downward dog, hands facing one another. If the two dogs are relatively the same size, they may be able to come finger tips to finger tips – if one is significantly taller, then their hands can overlap as shown in the adjacent photo. A third group member will now form the top of the pyramid! Partner 3 brings their hands onto the hips of one of the dogs (as shown in the left photo below), and one leg at a time will lift their feet up onto the hips of the other dog. Now you have an amazing pyramid. Be sure to talk to your group, checking in to see that everyone in comfortable. Once you are ready to come down, do so slowly – one foot at a time.
Picture
Picture
Wow! Who knew you could do so much with such a simple pose. Enjoy playing with your downward facing dog, and let us know of any fun new ways that you come up with to do-the-dog! 

As always, be bright, be bold, be you! Let your light shine.

Love,

Vanessa
1 Comment

Kids Yoga Pose of the Week! Pose #2, Seated Forward Fold

6/5/2015

1 Comment

 
We are so excited to bring you the second edition of our Kids Yoga Pose of the Week series! I have to say, the best part so far has been putting together all the variations of each pose....That's the beauty of kids yoga, there's no right way, there's no wrong way, there's no ONE way; as long as you are getting active, having fun & doing what feels right for your body - then it's a lovely thing! 

Seated Forward Fold

Aka: PB&J Sandwich, River, Making Cookies, Leaf, Pizza, Pie, Cake, and whatever else you can think up!
Picture
A special thank you to www.afterschool.ae for making this blog series possible with all of your amazing images! You rock!
How to:
  1. Sit with your legs straight out in front of you, feet together. Spine is long, shoulders back & right over the hips. 
  2. Inhale, reach your arms up to the sky.
  3. Exhale and begin to fold forward from your hips bringing your belly in towards your thighs as you reach towards your feet. It’s not important to grab the feet, just think about keeping the spine long! Maybe you reach for the knees, side of your calves, ankles, or outer edges of the feet. 
  4. Take 3 deep breaths in and out through your nose. With every inhalation, feel your spine lift & lengthen! With every exhalation, fold a little more into the pose.
  5. To come out, bring your belly away from the thighs & begin to reach the arms up as you inhale. Imagine the tailbone leading this movement, pulling down towards the earth to help you rise up.

Fun variations:
  1. PB&J Sandwich: Start seated the same way, but before you fold forward…. Reach up with one arm and grab the tub of Peanut Butter, take a giant scoop with your hand and smear it all over your legs, chest, arms, and face. Then grab the Jam with your other hand and do the same. When you’re all done smearing, reach both arms up as you inhale & bring the two slices of bread together! What other types of sandwiches could you invent?
  2. River, Rock & Roll: This simple seated forward fold can also be called river! To do the river rock and roll, we start in river, inhale to come up quickly & build momentum as you exhale rocking backwards to lie onto your back & swing your legs up and all the way over - touching your toes behind your head. Quickly again to build momentum, inhale rolling back up to river pose. Do this as many times as you would like!
  3. Making Cookies: Start seated the same way. Bend your right knee, bringing your foot flat onto the floor. With your right hand, reach for your knee & with your left hand reach for your foot. Bring your leg up so that your calf is resting horizontally (same position as rocking the baby). This is your dough mixer!! Mix your leg one way, rotating in a circle, mix your leg the other way and then switch – repeating on the other side. Time to roll out the dough! Stretch your legs out in front of you, just like the seated forward fold. Grab your rolling pin, and exhale as you roll the dough out towards your toes, inhale as you roll back towards yourself. Grab your cookie cutters (make circles with your hands) & cut your shapes out all along your legs. Move your cookies onto a baking sheet and put them into the oven as you lay down onto your back to bake. The rest is up to you! 
  4. Pizza/Pie/Cake: Seated in the same position, take your legs out wide to create a triangle shape. The remainder of the steps are the same, this is just the wide-leg version of the forward fold! You can also treat these three as you did the sandwich, reaching up to grab a variety of different toppings. 

Benefits:
  • Calms the brain and helps to relive stress
  • Stretches and lengthens the spine, shoulders & hamstrings
  • Improves digestion
  • Soothes headaches, anxiety, tantrums & reduces fatigue

Connections:
  • Turn this into a partner pose with some serious fun! Sit facing each other, legs extended, foot to foot. Inhale, reach your arms up, exhale folding forwards as you normally would but add in a double high five on your way down. Then when you are in the full fold, try tickling your partners feet! 


There are so many great, creative ways to play in a forward fold! I hope this post gives you some new ways to freshen up your regular old forward fold & inspires you to think outside the box in your next class. If you have any other ways that you love to play in a seated forward bend, please share in the comments below!

Wishing you a BRIGHT, BOLD & YOU-Ish day!

In Love,
Vanessa
1 Comment

    Subscribe to Shine On to receive weekly kids yoga resources, ideas & stories. Enter your email address below:

    Delivered by FeedBurner

    Archives

    June 2021
    March 2021
    February 2021
    June 2020
    October 2018
    June 2018
    May 2018
    April 2018
    March 2018
    February 2018
    January 2018
    December 2017
    November 2017
    October 2017
    September 2017
    August 2017
    July 2017
    June 2017
    December 2015
    August 2015
    July 2015
    June 2015
    May 2015
    April 2015
    March 2015
    February 2015

    Categories

    All

    RSS Feed

Glow Yoga Kids Edmonton   |   Edmonton, Alberta, Canada   |    587-712-9900  |   info@glowyogakids.com
Picture